Thursday, September 15, 2011

Banana Chocolate Chip Cookies

My toddler LOVES bananas. I mean he would eat them all day long if I let him, which is not necessarily a good thing. I mean most of us know what the BRAT (Bananas, Rice, Apples and Toast) diet will do to a person! So, every so often I have to commandeer the bananas. Unfortunately, in order to avoid the arguments over having another banana, I always hide them out of sight. Which, is really bad because, with so much going on, I'm on of those people that if it's out of sight, it's out of mind!  So, more often than not, I end up with either very black bananas or furry ones!

I would make banana bread with them but seriously, how many times a month can you eat banana bread?! I could dehydrate them and save them as snacks but, no one in the house will eat a crunchy banana! So, I brainstormed for a while and then remembered a recipe I read a while back from one of my favorite bloggers. I mean my FAVORITE! I have never shared him before, like I could keep him all to myself and then I wouldn't have to share him! :D I think he's only got about 1000 followers now, well more really, so my dream of keeping him all to myself is sadly....well, just sad! So, I have to share him now because these cookies are great, although, I made a slight alteration or two to the recipe. I hope Garret forgives me for it! (yeah, he'll never find this blog but, just in case!)

Garrett's Grandmother's Banana Cookies

This is Garrett's picture. 
Ingredients:
1/2cps of unsalted butter, room temp.
1cp of sugar
1 egg, room temp
1 cp mashed bananas
1tsp baking soda
2cps flour
a pinch of salt
1/2 tsp ea. of ground cinnamon, ground cloves, mace or nutmeg
Optional - 1cp pecans, walnuts or chocolate chips or mix and match


** I added a little more clove and cinnamon to my batch (almost a tsp each of both). I also added just shy of 1tsp of vanilla. 
Vanilla makes any cookie taste better right?! :) I also didn't have an unsalted butter around for once, so I used regular. I simply had to forgo the salt. 


Directions: 
Preheat the oven to 350 degree F. Cream the butter and sugar until light and fluffy. Add the egg and continue to beat until well mixed. 


Mix the mashed bananas and baking soda in a bowl and let sit for 2 minutes to froth a bit, this gives the cookies their rise. 

Mix banana mix and butter mix together. Combine the flour, salt and spices, then mix into the wet mix, until just combined.

Fold in your pecans, chocolate chips or whatever you chose as an optional ingredient. Then dollop onto a parchment paper lined baking sheet. Bake for 11 - 13 minutes or until nicely golden brown. Then remove them to cool on a wire wrack.

**Sidenote here: You can use that nonstick foil to line your pan but, there is a reason Garrett says to use parchment paper. Even with the foil, these cookies are soo cake-like and moist that they actually stick a little to the foil. If you're careful and give them a minute, you can remove them with no issue. I learned this the hard way the first time I made these!


These are mine. Not bad looking, nothing like his but, still not bad! 


I swear these are seriously the best banana cookies ever! I stay away from nuts because of allergy issues but, I HAVE to put chocolate chips in there! Though I will say, these cookies could stand on their own without a nut or chip in it. 


Here is Garrett's blog because you quite literally have to check it out! When I post this to Facebook, I will of course include his page on there as well because he really is an amazing baker, chef, food lover and I seriously love his humor and outlook a lot of the time. 

Saturday, September 10, 2011

Space matters and How to Make a Spreader

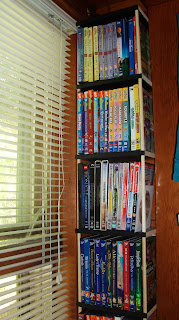
Here it is Saturday and instead of relaxing, I've developed spring cleaning fever.....er well, fall cleaning and organizing fever. I have my printer/laminator area all organized and set up. The boys' homeschool area all set up and organized. Their game/play room, almost completely perfected to my liking but, there was one big monster to tackle. The boys' movies!

They had a tendency to go grab a movie, and either throw the case onto the side of the TV or the window seat area (because it's next to our TV) or throw the movie from the DVD player there. Which always made me slightly cranky! So, I'm going to show you my Blue Collar to solution to this. One, the house we live in is almost 100 years old. 96 years old to be exact. Not a big house by any means and houses built in this area around that time had little to NO closets. Yeah, that's right ladies, NO CLOSETS! In fact when this house was built, there was no kitchen or bathroom even! I try not to lay awake at night imagining where on the property the outhouse sat. Oh the nigtmares I've had over that thought!

Anyway, so the point is that there is VERY little space in this house for storage or for storage of items that need to be kept out of the way but, that we use everyday. So, every little nook and cranny matters. On our window seat area though, there are little insets on each side of the row of windows. Coincidentally, about the same width of a DVD case when standing on it's end. :)

 This is the right side. 

 The left. 

How ingenues is this? I didn't paint it or anything yet, I wanted to get a feel for how it would work. Anyway, it was really simple. I measured between the edge of the window to the beginning edge of the window box thing - yes, that's a technical term. I measured the size of a DVD case standing on end. Downstairs I had some extra shelving from another bookcase I got for free and cut them to size. Actually about 1/4 bigger so that there would a little lip in front of behind the cases. I then took them to the boys' grandfather and had him drill just a little bit into the shelves so that the dowels would fit into there nicely enough. I glued them into place, and let them dry. They were a tight fit into the space, like I wanted and I had to kind of hammer them back in a bit. I'm sure it's marred my wood around the window but, that's ok. When or if they every come out again, it will be time to refinish the wood or paint it anyway. Yes, I should've painted it ages ago but, I'm kind of in love with it now. :P

The spreader is a good idea if you've got small children who like to help when cooking and baking. Not to mention if they say, break an arm! Yes, we've already been down that road! A friend of mine is handicapped and can only use one hand and my mother's neighbor is unable to use her one arm as well. So, this comes in handy for them as well.


I don't know if you can see it here or not but, it's flat. Flat as a pancake! I simply bought a cheap spoon, placed it between two towels and then took it outside. I hammered it flat. Pounding one side, then turning it over to pound the other. I did this over and over again until it was flat enough for me. Now, the boys can easily keep their Vegan butter on it, to butter their bread. I didn't have to spend an arm and a leg for it either. Just a quick idea to maybe give you a hand or your kiddos an easier tool to use to help them be more independent.

Have a good weekend!

Saturday, September 3, 2011

Zucchini Bread

Growing up, I was not a fan of anything other than white bread. Wonder bread to be exact. I mean it had all those colorful circles. How could any kid not like that? I never ventured to wheat bread, and banana bread was a huge no no. I mean bananas actually in bread?! That was just wrong on so many levels in my sweet, young, little mind. Not to mention my avoidance of anything fruit or vegetably (yes, that is a word!). So, zucchini bread, there was no way you could've paid me enough to eat that!

Then I grew up. Well, I should say my taste buds grew up, kind of but, at least they were willing to try new things. :)  So, in came banana bread, then my yummy pumpkin bread (from Alton Brown), made without the pumpkin seeds cause I eat them all! And now, Zucchini Bread!

I got this recipe from my mother who got it from a friend of hers. Now, I loved the recipe as it was but, if you've not figured out by now and in case the new followers don't know, I like flavor! I like being able to bite into a piece of something and taste a little nutmeg, vanilla or clove. So, I adjusted the recipe. I will give you the recipe as it was and let you know where I changed it. It just needed a little dressing up for me was all and when the house filled with the flavor of the bread, I knew it had turned out alright. :)

Ingredients: 


2 2/3cps of sugar
2/3cps of shortening
3cps of shredded zucchini ( I used about 4cps - using a "wet" ingredient measuring cup, not dry)
**P.S. A side not here, shredded zucchini means that you peel it first and then put it into your food processor or you can painfully do it by hand with something like a cheese grader if you have no, food processor. Yes, peeling it would seem obvious to some but, my girlfriend tried my recipe and didn't peel it! 
2/3cps of water (I actually used about half of this)
4 eggs
3 1/3cps flour
1/1/2 tsp of salt
1tsp of cinnamon (I used about 1 1/2 - 2tsp)
1tsp ground cloves ( I used what my mother refers to as a rounded tsp, I tell the boys it's a spoonful with a small hill on top!)
2tsp vanilla (I used about 2 1/2 tsp)
1/2tsp baking powder
optional ingredients:
2/3cps of chopped nuts and/or raisins

Directions: 
Preheat oven to 350 degrees Fahrenheit.

The recipe calls for greasing only the bottom of the loaf pans but, I just used parchment paper. I cut it to the size of the bottom and left it long enough to drape over the sides. So, that when it was done baking, I could loosen the ends with a butter knife, grab the ends of the parchment paper and lift. Below is a picture of what I'm talking about. It's blurry because there was a 3yr old under foot trying to peek in there too! So, I turned and snapped. Alas my photo skills are seriously lacking.

Cream together the sugar and shortening in a large bowl (2qt. or so). Stir in the zucchini, water and eggs. Then mix in the rest of your ingredients. I did the whole "baker" thing and slowly added the dry ingredients in, a little at a time but, the recipe doesn't actually call for it. If you've opted for nuts or raisins now is the time to add them in. I used neither of the two.

Divide evenly amongst both pans evenly. And bake for 60 - 70 mins - this is what the recipe called for but, mine took considerably longer. Mine looked considerably runny though, most likely from the added zucchini. So, it needed a bit more time to cook. To check when yours is done, do the toothpick thing or a butter knife coming out of the center clean, will do just as well too.

Let it sit for at least 5 min. Then remove from the pans to cool onto a cooling rack.

Again I apologize if these pictures are not up to par but, I was also using someone else's camera because I forgot to unload the pictures from mine and both memory cards were full. :P

I of course had to sneak a bite while it was still warm and it was delicious beyond belief! My mother loved it, I was making all the yummy noises one does when they're eating something so good, which included a little happy dance. Though not the full on happy dance, just a little shimmy or two! :)

Anyway, hope you all make some of your own soon, because I'm being mean and NOT sharing!

Linked up to: